Drupal 9
Note: Drupal 9 or later versions are the recommended to integrate well with Kapost.
Drupal 9 is an open-source content management software. It provides a framework for websites, ranging from personal blogs to corporate and government sites. Drupal’s modules and tools enable users to build versatile, structured content for dynamic web experiences.
Note: Drupal 9 is highly customizable. We recommend that you speak with your Kapost Implementation Manager or Customer Success Manager to discuss the best way to set up this integration.
Kapost’s integration with Drupal enables you to publish content you create in Kapost directly to Drupal.
- Supported content types: HTML
- Supported analytics: Total page views, Click-throughs, Inbound links
-
Kapost relies on the built-in RESTful Web Services and HTTP Basic Authentication modules. It has no other dependencies.
Establishing a Connection
Before you establish the connection, it is necessary to install the Kapost module for Drupal 9. The Kapost module is free to install, see Kapost Module.
Note: You must have the access to your Drupal server to install the modules.
After installation, the module will open a Kapost specific authenticated REST API endpoint which has to be publicly available in order for Kapost to be able to connect to your Drupal instance.
Along with the URL to your instance, to connect to Drupal you will need a current Drupal account that you can access with a Drupal username and password. This user needs to be able to create and update nodes, and it will be the user account that connects to Drupal from Kapost.
Example: We recommend you to create and use a Kapost specific Drupal user account with the desired role/permissions for this integration rather than using an existing user to avoid any disruption if the user is suspended or removed from Kapost (in which case their access will be revoked).
Creating the Connection
- Log into the App Center Tab.
- Click the Install more apps button below the list of current connections.
- In the Kapost App Center, search for Drupal and click on the product tile.
- From the Select Instance drop-down menu near the bottom of the expanded tile, select your Kapost instance and click Install.
- You will see the Kapost App Center settings page once again, now with a connection panel open.
- Enter the authentication credentials for the Drupal 9 user you are connecting and click Connect.

After you click Connect, if the connection is successful, you will see the extended connection panel open.
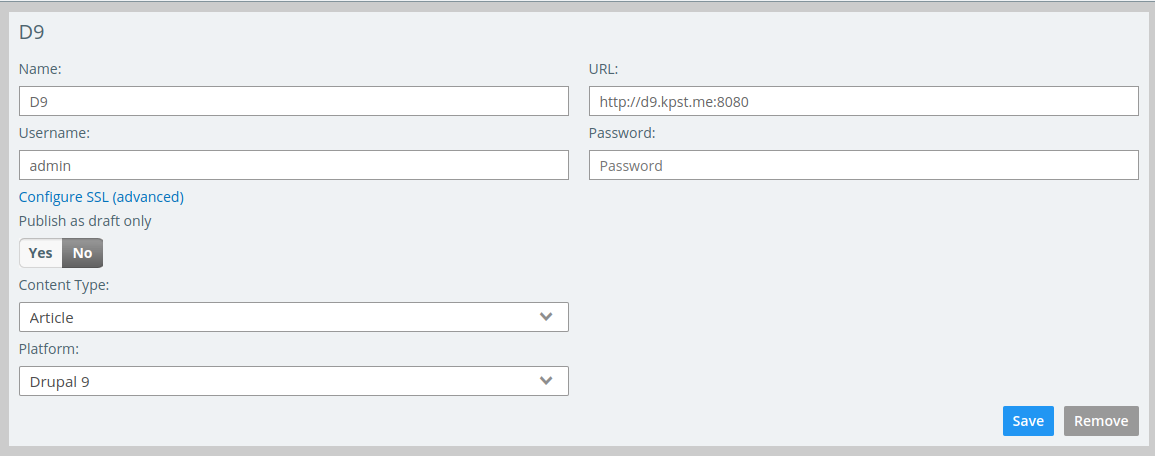
If you want to publish your content as draft, then select Yes, otherwise you can select No in the Publish as draft only option.
You can select the Drupal Content Type from the drop-down menu for this particular connection and click Save.
Note: You can only connect one Drupal content type per connection. To publish to more than one content type, you need to create another Drupal connection. You may use the same user for multiple connection with Drupal, but each connection must have a different content type.
Admins will add Drupal as primary publish destination for the content type you want to publish content from Kapost to Drupal.
- Go to the Content Types & Workflow in Settings.
- Choose the Drupal instance(s) you want to set as a primary destination.
- Click Save to record your updates.
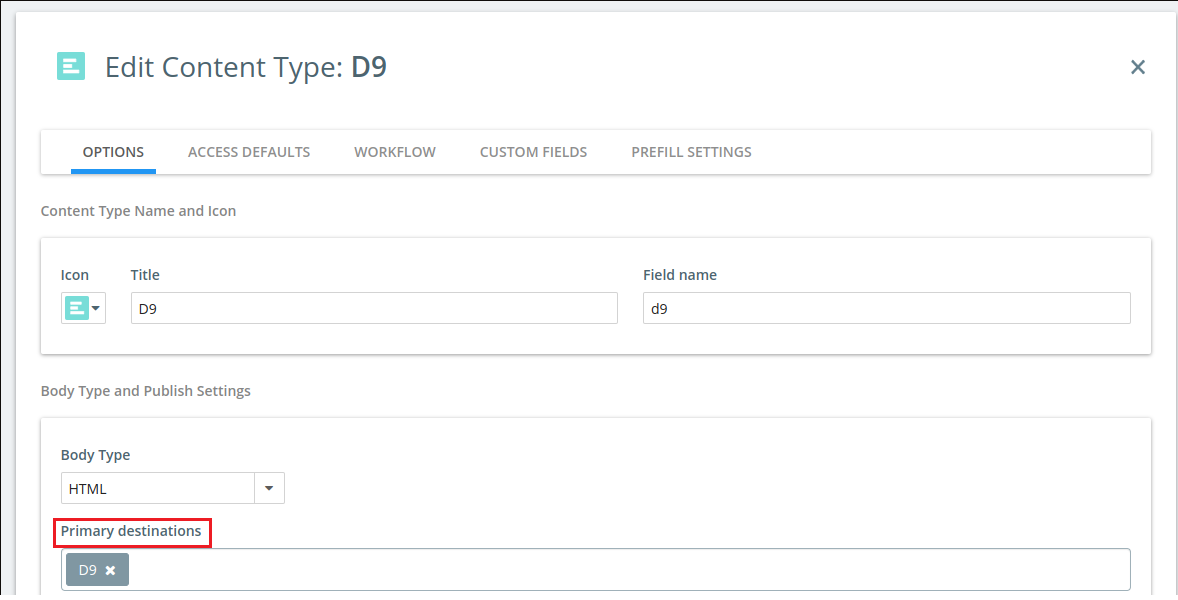
If you are not sure which content types will be used to publish with your integrations, speak with your Kapost Admin or Customer Success Manager.
Note: You can use prefills to set a default value for the custom fields. To learn about configuring prefills, refer to Prefills On Content For Admins.
When you have completed these steps, you are ready to publish content directly from Kapost to Drupal.
Publishing
Live or Draft: When publishing content, you can publish it as either Live or Draft.
- Publishing content as a draft means that the post you create will have its state set to Draft.
- If the same post is re-published again in Draft state, the already existing draft will be updated and no new posts will be created.
- If the same post is re-published again as Live, the existing draft is transitioned into the published state, and no new posts will be created.
- When publishing Live, the date the content is published will be set as the publish date in Drupal 9.
- Publishing content as Live means the content will be live on your site. Subsequent republishes will update existing Live content, and no new posts will be created.
Mapping Kapost Custom Fields to Drupal Fields
To create a custom field in Kapost, you will need to choose a name, a field name, a field type, and (if applicable) field values. All of these elements in Kapost have corresponding elements in Drupal field types.
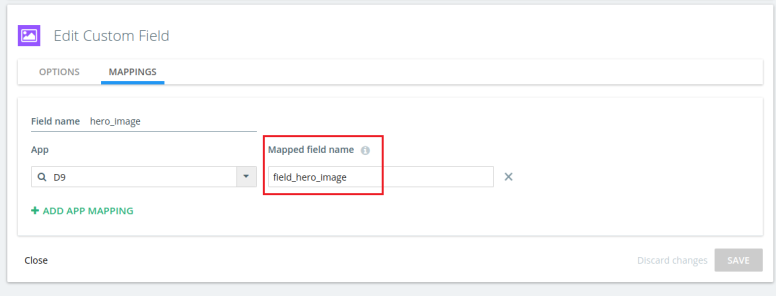
The custom field name in Kapost corresponds to the label in Drupal, the field name in Kapost corresponds to the machine name in Drupal, and the field type in Kapost corresponds to the field type in Drupal.
Note: The name in Kapost can actually be anything; the field name, however, must match the machine name.
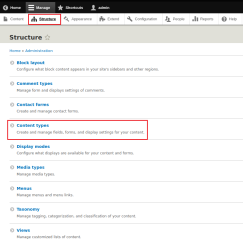
To see your Drupal field types, go to Drupal and navigate to Structure > Content Types > Manage Fields.
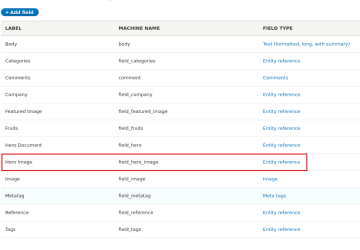
Your table should look like the image below - let's pretend I need to recreate the "Hero Image" field type as a custom field in Kapost.
As you can see on the table above, the Label is Hero Image, the Machine Name is field_hero_image, and the field type is Entity Reference (A media entity reference).
This is what the field would look like as a custom field in Kapost:
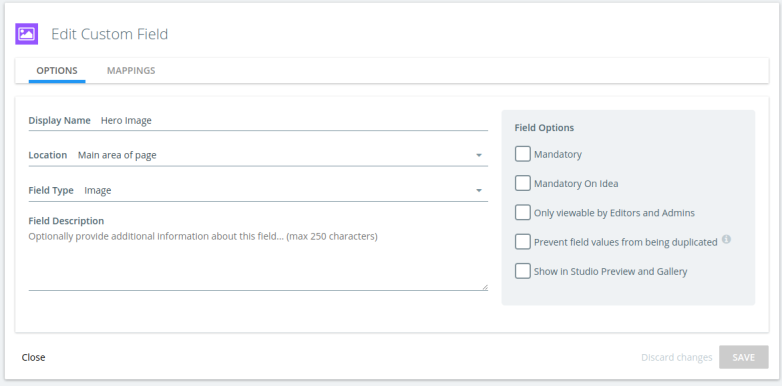
Please note how the Mapped field name has been set for the Drupal (app) connection to match the machine name in Drupal, in this case field_hero_image.
Configure Drupal 9
Installing and Configuring Drupal 9
To connect to Drupal 9, install and enable the Kapost module. This is the only module that has been installed and it does not have any other dependencies than the built-in RESTful Web Services and HTTP Basic Authentication modules.
Someone who manages your Drupal instance must install the Kapost module manually by placing the unzipped (unarchived) module into /sites/all/modules or /sites/default/modules inside the Drupal installation.
To enable the Kapost module, navigate to the Extend tab in Drupal and ensure the checkbox next to Kapost is checked.

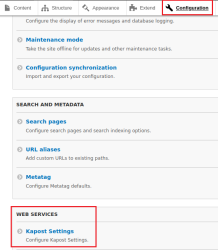
Now you are ready to configure the Kapost module. Navigate to the module in the Configuration tab. Find the Web Services section, where the Kapost Settings subsection is located.
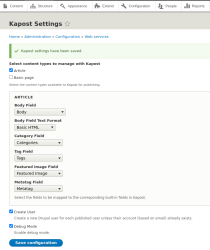
In the Select content types to manage with Kapost section, select one or more content types that you want to manage with Kapost and configure any of the built-in field mappings.
- Each selected content type will appear as an individual content type in Kapost on your Drupal connection in your instance’s App Center settings area. This means that, to publish from Kapost to multiple content types, multiple connections in Kapost are required for each content type.
- Article: Each selected content type will have a group of field mappings: Body, Category, Tag, and Featured Image. Kapost will use these mappings when syncing with any of these fields. If no field is specified for a given field, then Kapost will ignore it.
- The body field which maps to the main HTML body in Kapost also has a text format, which can be selected here. Generally, you may set this to Basic HTML.
- The Category Field is special: The CMS Category sync feature will use the Taxonomy (or vocabulary) associated with it to pull Categories into Kapost.
- Create User: This setting is related to Kapost’s setting. On publish, always use the CMS User as the author which is only applicable when that setting is turned off (the default). If the box is checked, Kapost will create or use existing Drupal users during publishing in order to implement correct bylining.
Finally, you will ensure that the correct user permissions are set up in Drupal. In Drupal, navigate to the People section to manage user permissions.
Note: Failing to set up the proper permissions will prevent Kapost from being able to publish content correctly.
Drupal 8’s supported field types are:
- Content Reference
- User Reference
-
Taxonomy (Term) Reference
-
Media Reference (Media Types)
-
Timestamp (unix timestamp)
-
DateTime (iso date time)
-
File
-
Image
-
Text
-
Text Long
-
Text With Summary
-
Text Formatted
-
List (Integer)
-
List (String)
-
Integer
-
Boolean
-
Link
Reference Fields in Drupal 9
There a several reference field types you will see if you are using Drupal 9:
-
Entity Reference
-
User Reference
-
Node Reference
-
Taxonomy (Term) Reference
-
Media Reference (Media Types)
The Entity, User, and Node field types are drop-down or multi-select custom fields in Kapost. These reference field types hold a unique reference ID to link a piece of content with another entity.
The Media Reference field types are image or file custom fields in Kapost. Kapost will take care of automatically uploading these into the Media Library and associating them with the content in Drupal.
The Taxonomy (Term) field type does not use a reference ID. Instead, this field type is looked up by the term name. The Kapost module takes care of this look-up. So, you can enter the actual term name in Kapost and it will translate into the correct reference ID in Drupal 9.
